Last in the series of retheaming Ubuntu is application customisation. While the desktop themes you use change the way you see your desktop and can make or break the your desktop experience, the applications you choose to use also play just as large a part. The applications determine the way you interact with your PC. The number of times you have to click to open a favorite folders, where you place your application shortcuts, the way your windows get stacked or tiled, and also to what extent accessories work automatically.
When using the default Ubuntu desktop (Gnome) the main interface applications see after bootup are:
- gnome-panel – The top and bottom panels
- gnome-applets – The items on the top and bottom panels
- nautilus – The file manager and desktop icons
- metacity or compiz – The window decorator / manager
Userspace Daemons
Underlying those applications are others that run in the background, which can be found via System->Preferences->Sessions. In the following list only the applications which are not self explanatory have descriptions. Applications that are referred to as daemons are just applications that run invisibly in the background, either at a system level which affect everybody using the machine (such as mail server daemons), or at a userspace level which only affect you. Most of the applications in this list fall into the category of userspace daemons.
- AT SPI – Assitive technology (For keyboard and mouse assistance and screen reading)
- Bluetooth Manager
- jockey-gtk – Checks for new hardware drivers
- gnome-keyring-daemon – Keeps stored passwords safely in a keyring and keep them in memory
- gnome-settings-daemon
- network-manager
- OpenOffice Quickstart Applet
- Power Manager – For managing laptop battery’s and CPU speed for conserving power
- Print Queue Applet
- PulseAudio Session Manager – The sound server
- Remote Desktop
- Tracker – For keeping a database of your files for fast searching of names and contents
- Update Notifier – When system updates are available
- User folders updater
- Visual Assistance
To slim down system usage and increase startup times unused items above can be disabled. And on the flip side, common applications that you want to start every time you login can also be added here too. On slower systems I disable tracker, and on my personal machine I also start pidgin, skype and tomboy.
Gnome Panel
The gnome-panels are initially located at the top and bottom of the screen. On their own they are not very use full. Their contents though are made up of gnome-applets. The default applets are:
- Top Left:
- Menu Bar
- Firefox Launcher
- Evolution Email Launcher
- Help Launcher
- Top Right:
- Notification Area
- Volume Control
- Clock
- User Switcher
- Bottom Left:
- Show Desktop
- Window List
- Bottom Right:
- Workspace Switcher
- Garbage Bin
New applets can be added to the gnome-panel by right clicking the panel where a new applet is desired, selecting Add to panel then selecting the desired applet and clicking Add.
Some applets can also be customised by right clicking on them and selecting Preferences.
New panels can also be added or removed by right clicking on an existing panel. The minimum number of panels is also 1 so dont worry about deleting all the panels and not being able to create a new one.
My preference is for a single panel at the top of the screen with my only additional applets being a Menu shortcut, and System Monitor displaying CPU, memory, and disk activity.
GNOME Do
GNOME Do is also fast becoming a favorite application for me. Especially with the addition of the Docky theme. A precise description of GNOME Do is best found on it’s homepage.
GNOME Do serves me in many ways as a global shortcut key. The shortcut key is by default <Win>-Space and after activating gnome-do the basic procedure is select and item and preform an action on it. Maybe some examples I use often will make this clearer. I will skip the shortcut key and dive straight into what I type and what I type I show in bold and the completions GNOME Do makes is non bold. And GNOME Do is not case sensitive. Some examples may have upper case characters, but I just type everything in lower case.
GIMP Image Editor <Enter> – Just typing gimp and pressing enter executes the default action for that item. In this case launching The Gimp. I also use this example for launching most applications I use. It does help to know the name of the application first though as there is no automatic list. Also from the screen shot you can see the whole name of the application as GIMP Image Editor. You can enter as much or as little of that name until you see the result you want. You can even just press g then the up and down arrows to move through the list of items that GNOME Do has found with that letter starting from the most commonly used.

Mum <Tab> Chat <Enter> – Pidgin plugin required. This opens a Pidgin conversation window with my Mum. Simple. No reason not to keep in touch now.
Downloads <Enter> – Opens my Downloads folder
Temp <Tab> Open Terminal Here <Enter> – Opens a new terminal in my Temp folder.
Install <Tab> banshee <Enter> – Install a package using apt. Banshee here is only an example. I use this command a far bit more than I should sometimes.
Search Google <Tab> Search Term <Enter> – Search Google for your search term and either display the results in GNOME Do or in a new browser tab.
Installing GNOME Do
The latest Ubuntu releases for gnome-do can be found at the GNOME Do PPA. Once you have followed the instructions for adding the PPA to your Ubuntu repositories, install gnome-do and gnome-do-plugins. 64bit builds of GNOME Do are also broken on launchpad at the moment, but there is a link at the top of the launchpad page to download the working package (as I had to do).
Configuring GNOME Do
After installing gnome-do it can be started from Applications->Accessories->GNOME Do.
The initial window looked a bit useless when I first saw GNOME Do, but you quickly learn that it’s simplicity is it’s strength.
If you do not see the GNOME Do window after launching try pressing <Win>-Space.
Click the triangle then Preferences in the top right corner to start configuring GNOME Do. I first change the Theme to Docky on the Appearance tab, then tick any plugins that look like they would be use full to me. To see how to use a plugin, click on it then click the About button below which will open that plugins wiki page on the GNOME Do website if available.
Applications can be added by dragging application launchers from the Application menus, gnome-panel or nautilus. They can also be removed from GNOME Do by right clicking and selecting Remove from Dock.
The length of Docky can be changed by dragging either end of the panel, and the height can be adjusted by placing the mouse the separator.
Zoom effects, window overlap, and the trash icon can all be configured by right clicking the GNOME Do icon.
Elements of GNOME Do
The default Docky theme will display from left to right: GNOME Do icon, application launchers, a separator, running applications and the trash icon.
![]()
The glowing dots below some icons indicate that the application is already open. If the application is not visible clicking it’s icon will bring it back to the fore, or if it is already visible, will minimise the window. If it is not open clicking the icon will launch it. Other actions can also be found by right clicking the icons, such as when the banshee plugin is enabled, right clicking banshee will give you Next, Play and Previous actions in addition to the defaults.

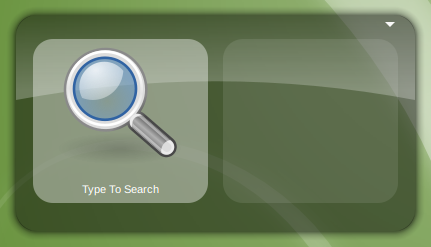
GNOME Do is activated by pressing <Win>-Space or clicking the GNOME Do icon and the panel then looks like the above. I have typed down, and it displays the Downloads folder as it’s first result. The plus in the circle on the left can be used to add this result permanently to Docky. The large folder icon display the icon of the currently found match. The smaller icon next to it is the icon of the default action if you just press enter. In this case Open Folder. Pressing <Tab> will then make the next icon the largest, from which you can choose your desired action.
The more you practice with GNOME Do the more shortcuts you will find.
Conclusion
I know this turned out to be a fairly large post about GNOME Do but using GNOME Do really has had that much affect on my desktop and the way I interact with it. And this is also the last beginner post I had to complete. As a linux sysadmin most of the rest of my posts will be more of a technical nature. But lets finish off with a final screenshot for good times sake in all of it’s minimalistic glory.

One Trackback
[…] Bowden: Retheaming Ubuntu – Part 3. Karl has a really nice series on making a new theme for GNOME and […]